Art of the DBA Rotating Header Image

What’s CHECKDB doing in my database restore?

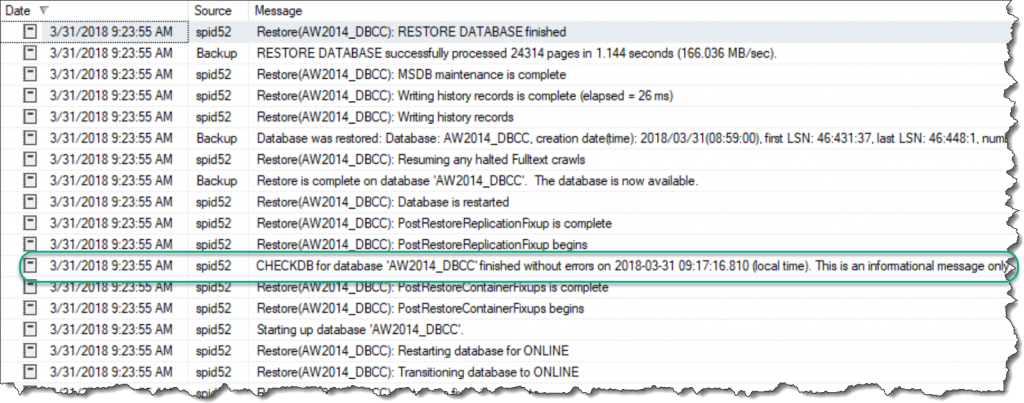
Recently I was doing some work with a friend around some database restores. It was pretty routine stuff. However, after one restore my friend came across something in the SQL Error Log that caught him by surprise. As part of the restore, there was a CHECKDB message for the restored database:

My friend’s first reaction was “why is SQL Server doing a DBCC CHECKDB as part of the restore?” He was concerned, because CHECKDB is a pretty hefty operation and this could really impact the restore time if he had to wait on a CHECKDB to complete. But the other confusing thing was that the date for the CHECKDB didn’t match up with the restore timing.

A Clean Start

Now I was pretty sure that the SQL restore didn’t actually run a CHECKDB, but I needed an explanation for this message. I figured I’d start with good old AdventureWorks2014 to test through the process. Also, since I needed to get in the guts of the restore, I broke out a few undocumented trace flags:

DBCC TRACEON(3014);
DBCC TRACEON(3604);
DBCC TRACEON(3605);

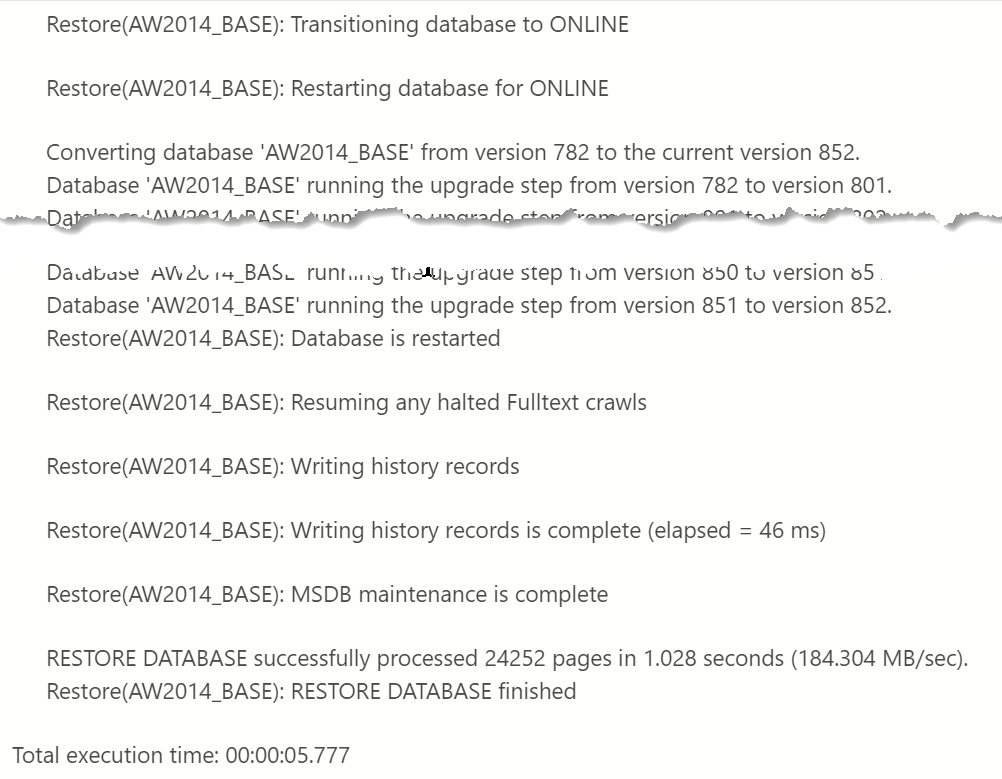
Trace flag 3014 is the important on, as it provides the details on what actually happens during a database restore. Once I turned these flags on, I ran an initial restore of the AdventureWorks2014 database to the name of AW2014_BASE and reviewed the output from TF 3014. I focused on everything from when the database was brought online to the completion of the restore.

Notice that no where in this output do we see evidence of a CHECKDB command. So far, so good, right?

Checking our CHECKDB

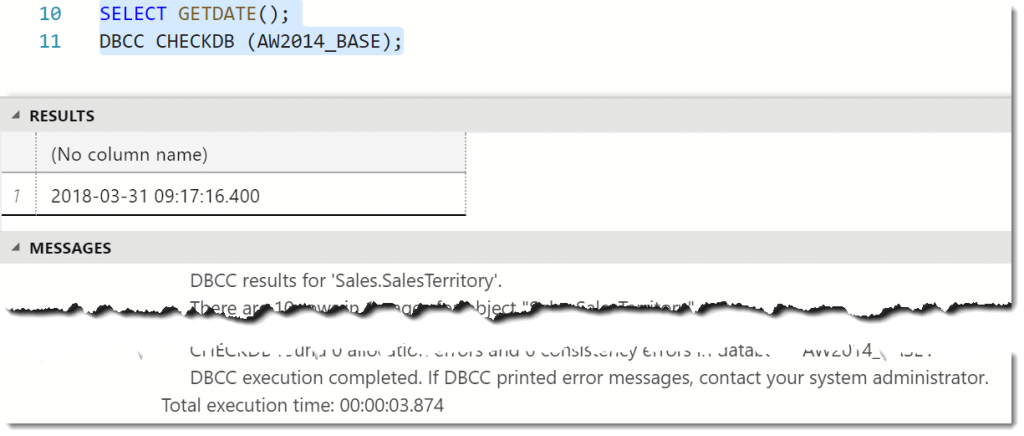
My suspicion at this point is that the CHECKDB message found in a database restore was actually unrelated to the restore itself. The next step was to actually run a DBCC CHECKDB against my test database (and capture the time the DBCC was run).

With this completed, it was time to do another backup and restore with my trace flags enabled to see what I got.

Lo and behold, our CHECKDB message is back. But what’s going on? Why did it appear here but not in the first restore? The key (as you might have already guessed) is to look at the datetime for the CHECKDB in the error log: 2018-03-31 09:17:16. This matches the time we actually ran DBCC prior to our backup. In fact, if we review the message output from the restore (and not the error log messages) for the same restore span, you’ll see there are no actual CHECKDB messages within the restore.

Mystery Solved

The answer here is pretty simple. When you restore a database, SQL Server is trying to help you by telling you the last time the database had a CHECKDB run against it. That’s actually why the message says “his is an informational message only; no user action is required.” However, for many folks not familiar with the process can be confused and jump to the conclusion that SQL Server is doing more than it should be. The key to clearing up these misconceptions is to use our tools to lift up the hood and see what’s going on internally. Once you look at these details, it’s pretty clear to see what’s happening and become better informed on how SQL Server works.

The 2018 SQL Backup Survey

Last year I joined on to Rubrik to help them sell their SQL Server database product. It’s been a fun challenge and definitely interesting working in the vendor space instead of having to field 3AM calls because something broke. This means that I talk to a lot of people about SQL backups and restores, especially about the challenges that your average data professional runs into. However, I based a lot of this conversation off of my anecdotal experience as a DBA. Being a data person, it felt a little awkward talking about these things in the absence of data.

This leads me to last week. In order to have some data, I decided to run an informal backup survey targeted at the SQL community. The results floored me: 344 of you decided to take my short survey. This really helps me understand some of the trends out there and now I want to share those results with you.

Before I get started, I want to first thank each and every person who responded from the bottom of my heart. This data is the result of your participation. Secondly, I want to underscore the “informal” nature of this. There’s a lot of holes that can probably be poked in the process, but I think the data is still useful and can give people insight into the trends.

I’ve posted raw data along with a few tools out on GitHub, where you are welcome to download and play with it. The tools include:

  • Two SQL scripts that create and process the data into a simple data warehouse schema.
  • An SSIS package (created by the SQL import wizard) that loads the raw data into the staging table
  • A PowerBI report that has a couple basic charts built off of the data.
  • A SQL 2016 SP1 backup of the database where I processed the .csv.

Note, my data warehousing/PowerBI skill set is nowhere as strong as others. I built something that was familiar to me and let me get at the data. I’m sure someone can build something better. Which is why I’ve made it public.

The Environment

As far as parsing out the data, let’s look at the questions and how people responded. The first questions were around how many SQL Servers(instances) and databases most people manage:

I think what’s interesting here is that the vast majority of folks out there manage a LOT of servers (36% have 100+ servers). Contrast this to a more balanced distribution across the database counts. This becomes even more interesting when contrasted against the data volumes:

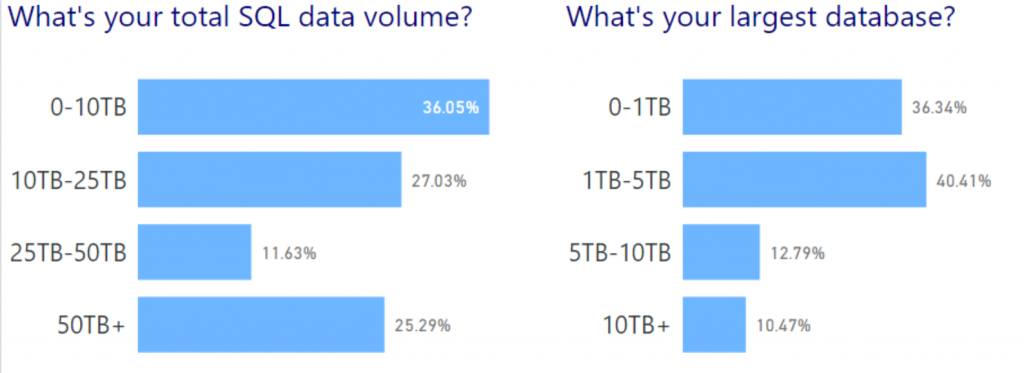
The majority of shops out there manage less than 25TB of total data, with most of these databases clocking in at 5TB or less. While 5TB is still a lot of data, this does mean that (when comparing this to the numbers above) most of the respondents manage “wide” environments, with more databases that are smaller in size. This becomes even more interesting when looking at the size of DBA teams:

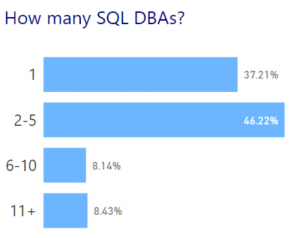
As you can see, the VAST majority (80%+) of companies employ teams of 5 DBAs or less. This means that in these wider environments, DBAs are responsible for a lot of objects. To me, this means that we have a lot of touchpoints to manage from a data protection standpoint.

SQL Use

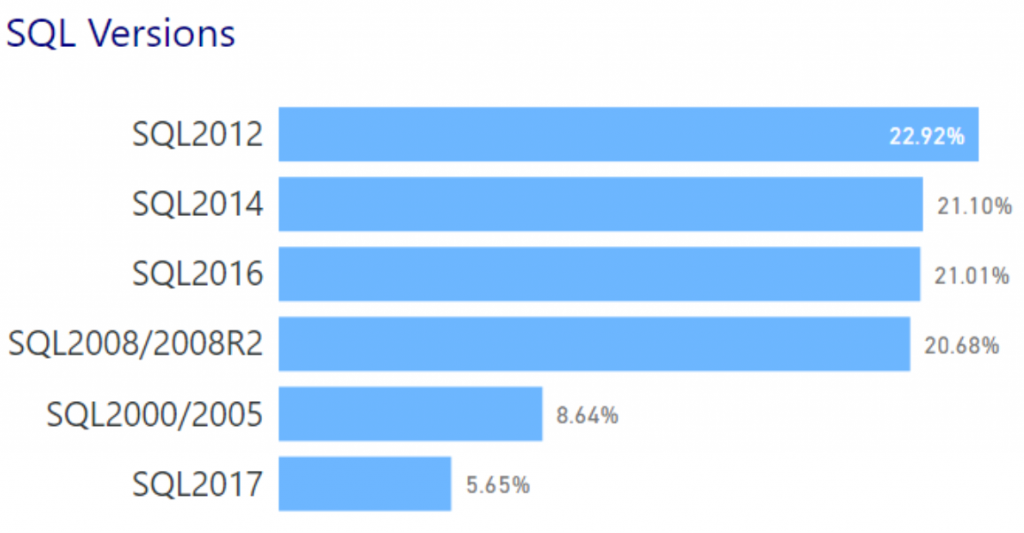
Other interesting tidbits filter in with the questions on how SQL is used. Starting with just the versions of SQL in use, it’s not really surprising that Microsoft’s mainstream supported versions are in use out there:

I was a little surprised at the SQL 2000/2005 number, but not shocked. I know how hard it is to phase out some of those legacy platforms.

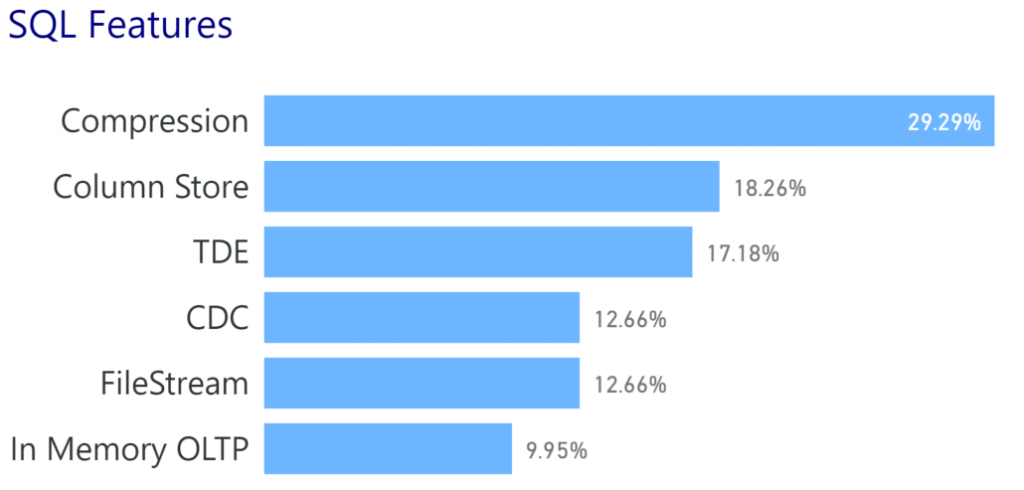
Nothing really surprising when it comes to feature use either:

I did hope to see compression higher because of the performance impacts it has, but the rest of these values file in line with my expectations.

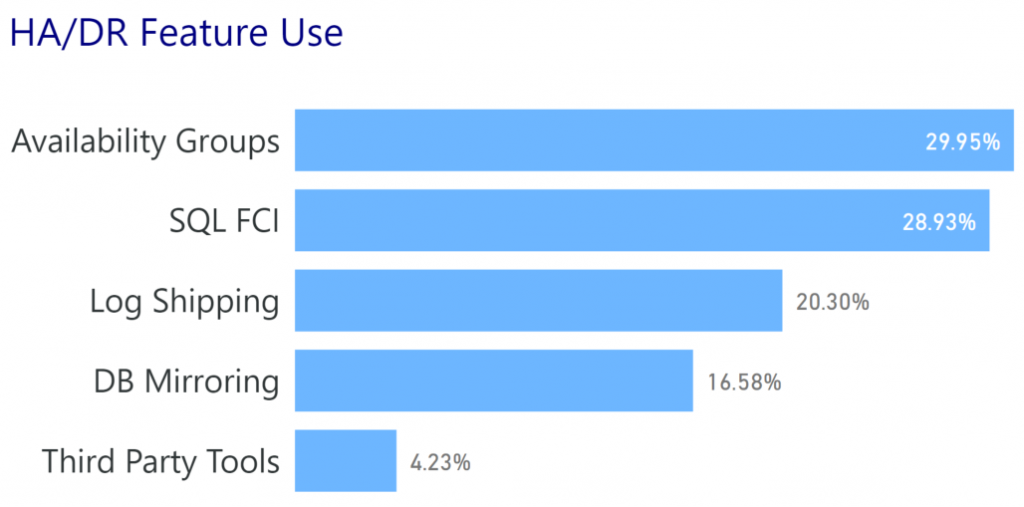
When it comes the High Availability/Disaster Recovery options, we also shouldn’t be too surprised:

Availability Groups have been a strong offering from Microsoft and something they’ve marketed hard. This has resulted in solid adoption, but it’s only a little higher than Failover Cluster instances. I’m also not surprised by the Log Shipping use, because let’s be honest. It just works.

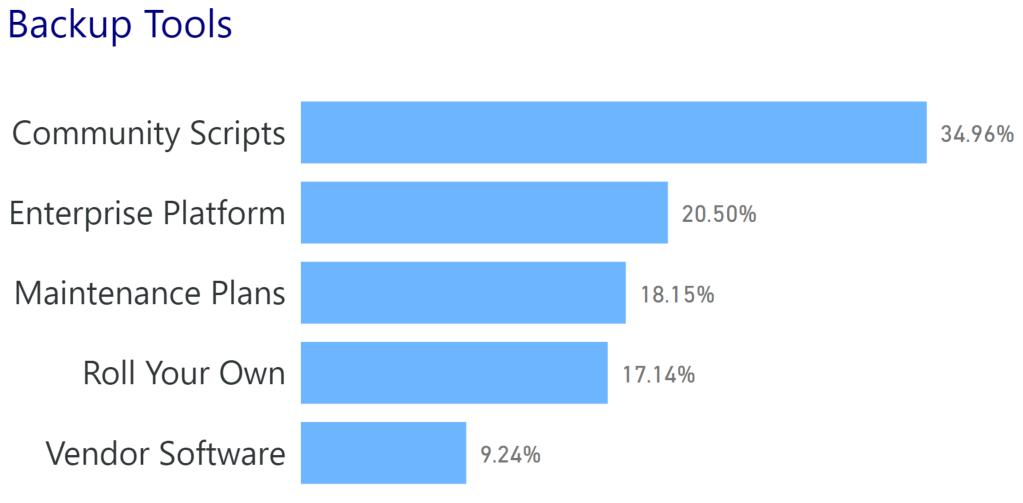
The final piece of data around backup tooling is of significant importance to me:

Almost 35% of you use some sort of community scripts, over 15% more than the next entry. This is significant because it means that most shops out there are relying on code that the SQL community provides for free. Think about that in context of other software platforms. Most are going to rely on purchased tools, but so many of us are comfortable with these community scripts that we entrust our company’s most important asset to them.

I was a little surprised at how high Enterprise Platform usage was, considering how many DBAs take a dim view of them. I think what also surprised me was that Vendor Software (Idera, Red Gate, etc.) was so low. Overall, we can definitely see where DBAs find value for running and managing their backups.

The Pain

The last question was more of a free form entry around what’s bugging people when managing backups. I’ll let folks browse it on their own, but here’s what I found interesting:

  • ~21% of the responses referenced concerns about having enough space for their backups.
  • Several respondents were frustrated by needing to build out reporting/management solutions.
  • There were many concerns about having access to backups or being able to restore them in an emergency (mostly due to lack of space to either store enough backups or test them).

Wrapping It All Up

There’s probably a lot of different possible conclusions that can be leapt to from this data, certainly outside the ones I made. I’m certainly not claiming this survey as anything definitive, merely some interesting observations made from a healthy community response. Hopefully you also find the data interesting and I hope it sheds some light on to what’s happening out there in the wide world of SQL Server.

Before I go, a couple shout outs:

  • Meagan Longoria (@mmarie) for telling me how and why my data visualizations sucked. Seriously, though, don’t hold what you find in the PowerBI report against her. :)
  • Chris Lumnah (@clumnah) for helping me refine the survey questions.
  • All the folks who shared the survey link, helping me get to 344 responses.
  • The 344 of you who DID respond, helping make this survey into something worthwhile

Defending Invoke-SqlCmd

Twitter. It can be annoying, it can be frivolous, but you’d be surprised at how many times it gives me a blog topic. This time around, I was having a back and forth with some folks about Invoke-SqlCmd. I had recommended someone try using it, which was followed by a lot of people griping about the cmdlet while suggesting other community tools or scripts should be used.

While I understand where a lot of these folks come from, I wanted to share a little, in a longer form, about why I use and recommend Invoke-SqlCmd. I think it still gets a bad rap from the PowerShell power users for some of its…quirks. I want to stand up for this handy little cmdlet, which I think is likely the most useful part of the SqlServer PowerShell module.

The .NET Root

When we start talking about Invoke-SqlCmd, what are we trying to do? At the core, PowerShell scripters need something to execute SQL commands within the context of a .ps1 script. I often speak of how PowerShell is a framework where you can tie different parts of the Windows stack together, so this ability to run SQL is needed.

One of the strongest elements of PowerShell is that it is built on .NET, which means we can always use .NET code and objects. In the case of SQL, we can use traditional ADO .NET code to execute SQL against a SQL Server instance:

$Datatable = New-Object System.Data.DataTable    
$Connection = New-Object System.Data.SQLClient.SQLConnection

$Connection.ConnectionString = "server=localhost;database=AdventureWorks2012;trusted_connection=true;"
$Connection.Open()
$Command = New-Object System.Data.SQLClient.SQLCommand
$Command.Connection = $Connection
$Command.CommandText = 'select top 10 BusinessEntityID,PersonType,FirstName,LastName from person.Person'

$DataAdapter = new-object System.Data.SqlClient.SqlDataAdapter $Command
$Dataset = new-object System.Data.Dataset
$DataAdapter.Fill($Dataset)
$Connection.Close()
$Dataset.Tables[0]

As you can see, this is pretty verbose.  We have to create a connection object and set its command string, then open the connection, execute the SQL, populate the data set, close the connection, then finally return the data set. No matter how you slice it, this is a lot of code for a simple SELECT statement.

SMOing it up

To avoid this verbosity, most programmers wouldn’t rely on the raw .NET unless they absolutely needed to. Instead, they would use existing libraries (or write their own if they had to). This is where the SQL Server Management Objects (SMO) come into play. I’ll skip the long boring explanation of what SMO is and just focus on the fact that we can use these existing libraries to simplify our call:

$smosrv = New-Object Microsoft.SqlServer.Management.Smo.Server
$query = 'select top 10 BusinessEntityID,PersonType,FirstName,LastName from person.Person'
$results = $smosrv.Databases['AdventureWorks2012'].ExecuteWithResults($query)
$results.Tables[0]

The SMO lets us reduce twelve lines of code (ignoring whitespace) to four for our SELECT output. This is the power of using existing libraries. We don’t have to reinvent the wheel for our work,which means we can focus more of our effort on everything around the SQL statement.

But what if we could make it even easier?

Keep It Simple, Sir (or Ma’am)

Three lines of code isn’t that much. The problem is that our code is a little less intuitive. Let’s keep in mind that most PowerShell scripters are not .NET programmers. Understanding dot notation isn’t necessarily difficult, but if it doesn’t come naturally to you there’s a learning curve that you have to climb.

This is where Invoke-SqlCmd starts to make sense. First off, it wraps up all the functionality of the above .NET code so we can use it with the cmdlet call. Also, it follows the founding concepts of the PowerShell language, where the syntax is verbose enough to understand what you’re passing as arguments. Let’s look at our simple SELECT now using Invoke-SqlCmd:

Invoke-Sqlcmd -ServerInstance localhost -Database 'AdventureWorks2012' `
    -Query 'select top 10 BusinessEntityID,PersonType,FirstName,LastName from person.Person'

If we break this down, you can see we have a clear set of syntax for calling the cmdlet. We specify an instance, a database, and a query. The output is an array of data rows, though it could be a datatable if you’re using the most current version. Most scripters are not going to need much more than that. It’s a straightforward solution to a simple problem.

So why not?

Why do people gripe so much about Invoke-SqlCmd then? Well, to understand this is to understand the history of SQLPS. For a long while, the SQL Server module for PowerShell was klunky and buggy. There were a lot of challenges with loading it and using it, such that many scripters decided to throw it out and write their own functions. In many cases, PowerShell folks would skip Invoke-SqlCmd not because it was bad, but because it came packaged with the rest of SQLPS and they wanted to avoid the entire module.

Now that the SQL Tools team has been reworking the module as SqlServer, this has become less of a concern. The module is less of a burden to load and the other components do not get in the way. There are also improvements and updates to the code to make it work better and serve more needs.

There are other reasons as well, but it usually boils down to the use case. Invoke-SqlCmd is great, but it can’t do everything. My anecdotal evidence is that the cmdlet will handle upwards of 90% of what I need it for, but there will still be edge cases. For these edge cases, we always have the more code intensive options available to us. This is why PowerShell is so great, there’s always another way, whether it’s writing more detailed code or using a community function.

To touch on this last point, this is where I also bump up against folks. There are some fantastic community functions out there. Seriously, check out DBATools if you haven’t yet. These tools enhance and expand your PowerShell experience and I make heavy use of these tools. They also have better alternatives that address the quirks of the core SqlServer module.

The rub is that you can’t always rely on community tools being available to you. Sometimes a corporate environment won’t let you install those tools or scripts. It might be that you go into a gig and they haven’t even heard of these tools. I can tell you that as consultant, I have to be very considerate of my client’s environments before I start bringing in outside code. However, because Invoke-SqlCmd is part of Microsoft’s tool set, I can rely on it being there. There are less steps and hurdles to making use of it.

Making Sense Of It All

There are a lot of reasons for using this little cmdlet. There are also reasons not to use it, depending on your situation or use case. My goal here is to not let the baby get thrown out with the proverbial bathwater. Invoke-SqlCmd is one of my favorite cmdlets in my toolbox and (most of the time) it does exactly what I need it to. Whether I’m writing scripts or working adhoc on a server, I usually don’t need a lot of fluff, just a way to execute a SQL query and sometimes get something back.

I hope you enjoyed my little love letter to Invoke-SqlCmd. I understand if it doesn’t suite your needs, but maybe you should give it another look? Or, if you’re a PowerShell newbie, you can see why using it can make your life a little easier. Wherever you go next after this blog post, I hope it is with a clearer view of how Invoke-SqlCmd can fit into your own PowerShell habits.

Query Plan Analysis with #PowerShell

A couple years ago I wrote a blog post on shredding query plans with XML. At the time, it was just an experiment. I investigated how to parse XML and a query plan without any real goal or purpose other than “what can I do with this?” Then I left it alone and didn’t come back to it.

At least not until recently. Fast forward a few years when I’m trying to tune a large SQL batch process that had a loop. It wasn’t a very pretty process and it worked, mostly, but it could definitely benefit from some performance love. The trick was trying to quantify the changes I made within. A common way to quantify this is to check logical reads. The lower your logical reads, the less “work” is typically done in your query. The trick was capturing all the executions within the loop and summing all the logical reads across a single batch execution.

At first I went to Plan Explorer. This is a great tool and had a lot of information, but what it was missing was the ability to sum up all my logical reads across the entire batch execution. I could look at each individual query, but to add these values up was going to be tedious and painful. Two things I hate.

At this point, I figured why not give PowerShell a shot? After all, I knew that the query plan was an XML doc and I could easily traverse that using the XML functionality built into the language. That combined with a little XQuery (which I’m terrible at, by the way) should solve my problem.

Armed with this knowledge, I charged ahead. Everything worked more or less as expected, but the one piece I missed from my previous blog post was using the XML namespace. See, you need the namespace so the XML pieces in PowerShell know what to query. I floundered with this for a bit until I found Jonathan Kehayias(@SqlPoolBoy) post on sanitizing query plans.

Once you have the namespace set, the rest becomes easy. To go with my previous example, the following statements allowed me to sum and compare logical reads across all statements executed in the batch:

#Read in query plan XML into XML objects
$old = Get-Content C:\Users\Mike\Documents\oldQueryPlan.sqlplan
$new = Get-Content C:\Users\Mike\Documents\newExecutionPlan.sqlplan

#Set namespace manager
$nsMgr = new-object 'System.Xml.XmlNamespaceManager' $old.NameTable;
$nsMgr.AddNamespace("sm", 'http://schemas.microsoft.com/sqlserver/2004/07/showplan');

#Query all nodes and then sum ActualLogicalReads
'Old Plan Logical Reads: ' + `
($old.SelectNodes("//sm:RunTimeCountersPerThread",$nsMgr) | Measure-Object -Property ActualLogicalReads -Sum).Sum
'New Plan Logical Reads: ' + `
($new.SelectNodes("//sm:RunTimeCountersPerThread",$nsMgr) | Measure-Object -Property ActualLogicalReads -Sum).Sum

Once the pattern is down, the use is pretty straightforward. There’s also more options accessible to you. If we just look at the RunTimeCountersPerThread node, we can compare other values such as Rows, Scans, and CPU time. We could really get crazy and extract all the different statements within the batch. There are numerous possibilities for analysis and review.

I’m not here to tell you that you should start using PowerShell to automate query tuning. Query performance is an art form and requires a lot of case-by-case analysis. However, like any great carpenter, it’s good to know the capabilities of your tool set. Understanding the options available to you not only helps you be more effective, but can also provide answers you may not have had access to.

Using #PowerShell to Restore to a New Location

Now that I’ve gotten some of my thought pieces out of my brain, I wanted to get back to some more technical posts, starting with some simpler techniques for people trying to figure out how to use SQL Server and PowerShell together. I know that a lot of database pros are starting to understand the importance of the language, but still struggle with some practical examples of how to get started. One of my goals with this blog is to bridge that gap.

When restoring a backup, it can be tedious to restore to a new location and have to figure out your MOVE statements. If you only have one data file and one log file, it’s probably not a big deal, but it’s still annoying. Usually, the steps for me are:

  1. Figure out my new data and log paths.
  2. Run a RESTORE FILELISTONLY against the backup file to get the files.
  3. Write out my RESTORE WITH MOVE commands using the new paths.
  4. Execute

None of this is difficult, but we can still make it easier. We have an established process, so putting some PowerShell scripting around it can automate our restore to make the script building faster and more consistent.

Our weapon of choice will be Restore-SqlDatabase. This workhorse cmdlet has been part of the both the old SQLPS and the new SqlServer modules. The functionality hasn’t really changed, meaning that what we go over here should work for you regardless of what module you use. I always recommend using the most recent version of the code, but don’t worry if you can’t.

The cmdlet is straightforward in its use. Fundamentally, all we need to declare is an instance, database name, and backup file. However, if we don’t declare anything else, the cmdlet will try and restore the database files to their original locations. Keep in mind this is no different than how a normal RESTORE DATABASE command works.

This is where we make our lives easier with PowerShell. First off, to move files using Restore-SqlDatabase, we need to create a collection of RelocateFile objects. Don’t let the .Net-ness of this freak you out. All we’re doing is creating something that has the logical file name and the new physical file name. In other words, it’s just an abstraction of the MOVE statement in RESTORE DATABASE.

Let’s look at some code. I’ve got a script, but I think the best way to approach it is to break it up and talk about each section individually, just to make sure we’re all on the same page. To get started, we should declare a few things: the new file locations, output of a script file, database name for the restore, backup file, and then an array we can store our RelocateFile objects in.

#Set Variables
$NewDataPath = 'C:\DBFiles\Data'
$NewLogPath = 'C:\DBFiles\Log'
$OutputFile = '.\restore.sql'
$dbname = 'AdvWorks2014'
$BackupFile = 'C:\DBFiles\AdventureWorks2014.bak'
$relocate = @()

Next up is a simple RESTORE FILELISTONLY to get our file list. This needs to be done with Invoke-SqlCmd because there’s no support in Restore-SqlDatabase (or any other cmdlet) for the file list option.

#Get a list of database files in the backup
$dbfiles = Invoke-Sqlcmd -ServerInstance localhost -Database tempdb -Query "RESTORE FILELISTONLY FROM DISK='$BackupFile';"

Now comes the “magic”. Our RESTORE FILELISTONLY call gives us a collection for all our files, but it’s all the old locations. We will look through this collection, do some string replacement, and create our RelocateFile objects. I want to call out the use of Split-Path -Leaf, a handy cmdlet that will separate out the different parts of a file path. By using -Leaf, the cmdlet give you only the actual file name. We can just append that value to the end of our new path (using Join-Path) and use that for creating the RelocateFile object for each file.

#Loop through filelist files, replace old paths with new paths
foreach($dbfile in $dbfiles){
  $DbFileName = $dbfile.PhysicalName | Split-Path -Leaf
  if($dbfile.Type -eq 'L'){
    $newfile = Join-Path -Path $NewLogPath -ChildPath $DbFileName
  } else {
    $newfile = Join-Path -Path $NewDataPath -ChildPath $DbFileName
  }
  $relocate += New-Object Microsoft.SqlServer.Management.Smo.RelocateFile ($dbfile.LogicalName,$newfile)
}

Creating the RelocateFile objects is the heavy lifting. After this, it’s just a matter of calling Restore-SqlDatabase with the right arguments. Note that I’m using the -Script argument and piping this to Out-File. We’re using PowerShell to create a SQL script, which is a pattern I like. As handy as these tools are, they don’t always get everything, so I will use scripts to create scripts and then edit the final output with whatever else I need.

#Create Restore script
Restore-SqlDatabase -ServerInstance localhost `
-Database $dbname `
-RelocateFile $relocate `
-BackupFile "$BackupFile" `
-RestoreAction Database `
-Script | Out-File $OutputFile

By saving and reusing this script, I have saved myself a lot of man hours for restores. The strength here isn’t in any mystery code or magic functionality. It is simply a matter of leveraging a framework to automate an existing process.

I’ve actually taken this script and created a more formalized function with it. The core is there, but in keeping with the tooling spirit, I’ve added some additional code that validates file system paths. You can find it on my GitHub repository and you’re welcome to download and make use of it yourself.

Highways and Railroads

Stop me if you’ve heard this one….

“We don’t have time for process, it just slows us down.”

In the buzz of today’s world, you’ve probably had this thrown at you at least once. Process has supposedly become an anathema to productivity. Everyone from developers up to CTOs seem to think that you need to get rid of process in order to turn out timely software.

Well, they’re wrong.

I understand the reasons behind it. As someone who’s had to fill out change request forms to alter a server’s MAXDOP setting, process can be tedious and troublesome. It can be a shackle that mires work in the swamp of forms and sign offs. When you’re living in a world of “get sh*t done”, process can be a thorn in everyone’s side.

There’s another side of the coin, though. Process, done right, will ensure that work is done the same way every time. It can provide protection against costly mistakes, unexpected outages, and other business pains that puts everyone under the gun. Also, if you build your process right, it won’t be a bottleneck to your work but a guide rail to keep you on the right track.

Driving vs. Riding

The analogy I like to use with folks when I explain the need for process is by comparing highways and railroads. Think about how you drive for a moment. When you’re on the highway, with a bunch of other people trying to get to the same place, you can only go so fast. You’re going to be limited to how many other cars are around you, so more traffic means slower speeds. Of course, then you get that one person who starts trying to move faster than is safe in traffic, usually causing an accident.

This is the lack of process at play. Different teams or developers have their own car and are trying to get to the release. However, everyone else is doing the same and your highway only has so much bandwidth. Sure, we have a road, so some path is defined, but there’s nothing to govern your interactions with the other cars other than general momentum and the number of resources you have to make the deploy work. You could make the road wider by getting more resources, but that’s not scalable.

Contrast this with a railroad track. It’s straight, narrow, and trains can fly along this because all the roadblocks are out of the way. You can link multiple cars together on a train to get everyone to the same place at the same time, which is a lot faster than using the highway. Even if the train moves a little slower than a car, it will still get there ahead because there isn’t anything blocking the track. You also get there safer because there isn’t any competing traffic to get in the way and risk an accident.

Building railroads is the goal of implementing process. You want to build something that is direct and well defined. What we lose in freedom pays off in speed. We’re building bullet trains that can deliver rapid deployments through consistent, repeatable action. This is achieved by  removing blocks, reducing stops, and streamlining the process we use to get things done. Process should not be a throttle, but a track, giving us a clear method of getting things done faster.

I’ve Been Working On The Railroad

How do we go about building this Nirvana? It takes cooperation between both development and operations teams to build this right, as both are invested in the outcome. Developers want to deliver new code to market faster and operations wants that code to be safe, stable, and not put the business at risk. Both sides must come together to collaborate on building the process. And make no mistake, this will be a building effort. There is no black voodoo magic in making this happen.

The first step is actually to write everything down. I always preach that the most basic form of automation is a check list. You can’t automate a process if you don’t know what it is. Start with a plan that everyone puts together for how software should be released and use that as your road map.

“We can’t take the time to stop doing everything just to put this together!!!” Yeah, I’ve heard that one too. No one is asking you to stop working just to switch to a new process. All I’m suggesting is, if you’ve got your highway, start building your railroad next to it. People will still be driving on the road.

You also might have people concerned about getting it right the first time. Let’s be honest here, you may not. Treat this plan like you would any other piece of work you have and develop it iteratively. Start somewhere and, as you build things out, fix the problems you discover. Your release process is just another piece of software, with features and bugs. No reason not to treat it in the same way.

Once you’ve got your plan, start following it. It might be inconvenient, but this is the sort of thing that takes discipline. It may seem tedious, but this is the start of a diet or exercise plan. It will be tough, but over time it will get easier and you’ll get better at it.

As you follow your plan, you will be able to introduce tooling and automation to speed up parts of your railroad track. Unit tests, automated builds, source control, incremental changes…these are all pieces of the process. Improve your process one piece at a time, making each new change so it can be evaluated and verified before moving on to the next step.

Build your process with the goal of removing traffic jams and slow downs. You want to lay down track to give guidance and consistency. You will find that you and those around you will achieve that mythical space of being faster, more reliable, and ultimately more agile with your software development. In short, you’ll run like you’re on rails.

All Aboard

Building this sort of process is at the heart of DevOps. DevOps isn’t a tool or a magic method, it is a deliberate culture of cooperation and discipline. The only way you will build your railroad is if you bring together development teams and operations engineers and work together to relieve your shared pain. That is the selling point: both sides share many of the same challenges, so it should a no-brainer to come together and solve those issues.

If you’re looking for a real world example, check out Farm Credit Services of America. This article articulates, in a very real way, how one company moved into a DevOps culture and built their own railroad. While there’s a lot of information in the article, at the core it is about how development and operations collaborated to achieve something together.

I’ve seen similar work in other companies. It is usually painful growth, but the results far exceed the gains. What is important is to not lose sight of the need for process. Getting rid of process, if anything, will hinder you just as much as following some archaic method merely because it is rote. Build your process with the goal of removing bottlenecks and establishing guide rails. You will find that you and those around you will achieve that mythical space of being faster, more reliable, and ultimately more agile with your software development.

(I want to thank Rie Irish(@IrishSQL) for proof reading and contributing to this blog article.)

We Are All Developers Now

Last year, I had a pretty intense conversation with a friend of mine at a SQL Saturday. It was one of those that started with the typical “grumble grumble grumble damn devs” statement. There was a time I would have echoed that with a hearty “harrumph harrumph”, but as I’ve progressed through my career, I’ve come to realize that the line between developers and DBAs has softened and blurred, particularly in the age of DevOps. What followed was a back and forth about the habits of DBAs and developers and lead me to a phrase I’ve added to my lexicon: “We’re all developers now”

I know, I know. What about the long standing division between righteous Operations folks (DBAs, sysadmins, network engineers, and their ilk) versus the .Net, Java, Node, and other heathens of the Developer world. These “barbarians” assail the fortresses of Operations with hastily written code that is not properly tested. This causes sleepless nights filled with pages  that a weary admin must respond to and resolve. Why would anyone in their right mind associate with these irresponsible practices?

Borrowing From Your Neighbor

The first step to answering this question is to step back and actually look at what happens in the developer world and compare it to what we do in administration. It’s a common practice to borrow code and practices from our peers in the SQL world, so why not do the same with those who develop other types of code? Especially those who develop code for a living (hint: consider the recursiveness of this statement).

As an administrator, I created all sorts of administrative scripts. Obviously I’ve got a reputation for PowerShell, but I also have T-SQL scripts that I use as well. For a while I would hack these together as any other good DBA and store them on a USB/Dropbox/Google Drive/OneDrive. It was functional, but I only ever had the current state of those scripts and didn’t always know why I changed things. I could put in a header, but this was tedious and manual, an anathema to how I work.

Enter my time at Xero. I hadn’t really used source control before and the teams there used it heavily. I got a rapid introduction to GitHub from Kent Chenery(@kentchenery) and Hannah Gray(@lerevedetoiles). It didn’t take long for me to realize the benefits of source control, not just for databases, but for my own personal scripts. Now I maintain my own personal GitHub repo and not only have a central location where my code is stored, but it can be shared with others who can contribute and collaborate.

Code, Rinse, Repeat

After adopting source control, I began to look at other developer practices and habits. While one can debate the pros and cons of Agile development, one of the concepts I like is iterative development. As with other work we do, iterative development isn’t rocket science, but it took me a while to adopt it because of a natural fear admins have: production paranoia (aka “what will this break”).

Admins of all stripes are in constant fear of breaking production, and for good reason. We want every change to be right and as close to perfect as possible. However, most folks who develop iteratively realize that perfect is a road block. It is hard to anticipate all the factors. When you develop iteratively, you ship what you can and fix/fail fast once you deploy it.

I’ve adopted this approach for my own script/process development. Whether I’m publishing a script or deploying a server, I focus on delivering a product. I test aggressively, but I’m prepared for the event that something will fail. I focus on the feedback loop to test, evaluate, remediate, and deploy. As an aside, this feedback loop is often where application developers will fail, because they are often driving towards the next set of improvements or features. It’s incumbent on both sides of the fence to adopt and enforce the feedback loop.

It’s All Just Ones and Zeroes

I could go on about habits I’ve adopted, but the real question is “why are developer practices important to administrators?” As we move into a realm of automation and scripting (as any good admin will), we are doing more and more code development. Sure, we can click through GUIs to setup SQL Server or run a backup, but the more experienced folks out there will have scripts to accomplish these tasks. Network and system admins are deploying infrastructure to the cloud using CloudDeploy or ARM templates. We live in an age where almost everything can be codified.

This codification means it is imperative that we focus on good habits for managing our code. It might be that we’re writing T-SQL code for SQL maintenance. Perhaps we’re writing shell scripts to execute code deploys or build a continuous integration pipeline. Suddenly we’re developers of a different stripe.

So what do you do about it? You probably haven’t implemented some of these habits and, likely, you might be a little mystified on how to get started. I suggest you start where I started: Go to a developer and talk to them. Maybe chat with a couple. Go to a local developer user group and see what they’re talking about. This is about learning, so find a mentor who can help you learn this topic.

And who knows? Maybe you can teach them a few things about your world while you’re at it.

Be Like Water

“You must be shapeless, formless, like water. When you pour water in a cup, it becomes the cup. When you pour water in a bottle, it becomes the bottle. When you pour water in a teapot, it becomes the teapot. Water can drip and it can crash. Become like water my friend.

Bruce Lee


If you look around the internet, you will come across this famous quote. Often cited by arm chair philosophers (myself included), these simple sentences speak on being flexible and adaptable within your life and how being too rigid can limit us. These limits will make it difficult to truly grow and improve ourselves, whether it is our professional or personal lives.

We can break this quote down in many ways, but I’d like to focus on how it impacts technology professionals. One thing I love about working in technology is how often things change. The joy comes from the constant learning we must do to keep pace. If we’re not pushing ourselves to explore and discover, we risk falling behind and losing our way.

Empty Your Mind

If we look at the IT career path through the lens of Lee’s quote, the idea of flexibility becomes obvious. Through my time in the IT industry, I’ve seen the rise of the Internet, the cloud, concepts like Agile development and DevOps, and other changes that range between large and subtle. If I’ve learned anything, it is that defining myself as a DBA, sysadmin, or developer limits what I am willing to do and narrows the opportunities available to me.

When someone asks you to take on a new task, how do you approach it? Do you look at it through the lens of your job role? Or, instead, consider how it relates to your career path? Do you determine what you want to work on based on what you know and are comfortable with, or do you let the opportunities shape your growth?

As technology professionals, it’s important not to limit ourselves. Today’s experiment might be tomorrow’s trend. A hobby we tinker with could easily become our driving passion. We need to be receptive to what’s around us, be formless and fill the demands that are presented to us. Do not close yourself off to challenges because you haven’t done them, but be prepared to know what it takes to fill those vessels.

H Two O

This probably sounds daunting because there’s so much going on in the technology world. Should we be able to do anything? Be ready to build networks, write applications, design databases, and so on? How do we keep up with the overwhelming number of disciplines and developing technologies in our world?

I’ve long held that the “full stack developer” is a myth. We live in a world of specialization and trying to have deep knowledge of all disciplines is impossible. Sure, we can understand something of everything (being a jack of all trades, master of none), but it becomes difficult to bring the full weight of our expertise to bear if we only know a little bit of a lot of things.

At some point in our careers we need to understand what makes up our “water”. This brings me to another long held view of mine: technologies change, but concepts remain the same. The example I like to use is relational databases. Over the years we’ve had platforms like Microsoft SQL Server, Oracle, MySQL, PostGREs…the list goes on and on. Each of these platforms introduces new features every few years, trying to one up each other.

At the core, though, each of these platforms is a relational database. The relational model was codified by E.F. Codd back in 1969. Think about that for a moment. While Microsoft SQL Server is adding new features every few years, the foundational concepts that we all work with are forty seven years old. Almost half a decade of a technological principle that we build our careers on.

I don’t consider myself a SQL Server professional. My skill set is not limited to just SQL Server as a platform, but relational database design and data management. I am strongest with Microsoft’s offering, but I can adapt to another platform because I understand and own the foundation. The core concepts are what I build upon, which is what makes me stronger and more prepared.

Be Like Water

Becoming like water is more than just being adaptable, it’s about understanding what defines you. Job roles and requirements are just vessels we fill with the knowledge and experience we have. If we choose to be like water, we remain fluid and can, at once, fill the needs of a role as well as be more than that.

Be the sum of the things you have learned, not the tasks you can accomplish. My challenge to you for the new year is to build a deeper, more fulfilling career. Flow and adapt, learn and absorb. Empty your mind and be open to the numerous possibilities in front of you.

Be like water, my friend.

T-SQL Tuesday #84: Getting Ready for your Presentation

boy-speech-lettersI’ve been super busy lately, but I wanted to at least post something for this month’s T-SQLTuesday. The topic is about encouraging new speakers, something I’m very passionate about. I think that speaking is one of the best things you can do to boost your career. If you are reading this and are considering speaking, I encourage you to reach out to your local user group and see if you can get started with a 15 or 30 minute session. Take a shot, I’ll bet you’ll be surprised.

What I want to share are some tips for the day you give your first presentation. A lot of folks are going to talk to you about building and preparing your presentation, but that is only half the battle. What you should do when you actually GIVE the presentation is often glossed over, even though this is the most high pressure moment of the whole cycle.

How do we reduce or relieve some of this pressure? Well, let’s start with a list of things that could possibly go wrong when you present. Think about the following list:

  • You’re presenting and you get an on-call page.
  • Your demo blows up spectacularly.
  • While giving your presentation, your computer attempts to apply updates.
  • You start 10 minutes late because you have issues with your video or sound.
  • During your presentation, someone sends you a picture on your favorite IM client:

oh_hai

Any of these will easily throw an experienced presenter off their game. For a new speaker, it can spell disaster. I’ve got a routine that I go through on the day of my presentation, which is designed to reduce that risk of disaster. And who doesn’t like reduced risk?

Getting Ready

Step 1: At the beginning of the day, well before my presentation, I make sure my presentation machine has been updated with Windows and other corporate software. This is SUPER important if it’s a Tuesday (when Microsoft releases updates). Doing this avoids any update surprises while I’m presenting or right before I go on stage.

Step 2: A couple of hours or so before my presentation, I will walk through my presentation. I open up the PowerPoint slide deck and step through it. When I get to demos, I will walk through my demo scripts. I test EVERYTHING, and do it in order. If I encounter an error, fix it, and then start over. This helps me insure that the flow works and that I understand what the step dependencies are in my demo.

Step 3: About an hour before my presentation, I will turn off everything on my presentation machine unnecessary to the presentation. Programs like Skype, Google, unneeded local SQL instances, Virtual Machines….so on and so forth. I only want what I need running to make sure that I have enough resources for my demos, along with keeping possible distractions shut down.

Step 4: At least 15 minutes before I’m due to present, I go to my room and hook up my presentation machine. I test the video and make sure my adapter works. This way I can address any tech issues that could hamper the presentation. I will display PowerPoint and also my scripts and demos to make sure everything looks ok.

I also usually duplicate my screen to the projector. This is important because if I extend, this means the only way (typically) that I can see what’s on my screen is to look back at it. This is distracting for your audience. If you duplicate, you only have to look down at your screen, which maintains contact with the audience.

Step 5: Right before I present, I turn my phone OFF. Then I put it in my bag. I get it away from me. I don’t want to get calls, I don’t want to have to worry about silencing it, and I don’t want it buzzing in my pocket if I’ve got a lot of notifications. The phone is off and away.

It’s GO time

At this point, I’m free and clear to do my presentation. Does that mean that nothing will go wrong? Of course not. However, performing these steps puts me in the best position to give my presentation without disruption. It is a foundation for success. Just like we build out our database solutions to minimize the option of failure, we need to approach our presentations with a similar sort of care to help guarantee our own success.

I want to thank Andy Yun(@sqlbek) for hosting this month’s T-SQL Tuesday. It’s a great topic and I hope folks get a lot out of it. If you’re considering stepping into the speaking world (and you should!), this month’s blog posts should give you all the tools to succeed. Good luck!

Azure SQL Databases with PowerShell: Moving To The Cloud

cloud-computing-2It’s been a while, but I want to wrap up my series on Azure SQL Databases and Powershell. In my last post, I talked about how you can make point in time backups of Azure SQL Databases using the Start-AzureSqlDatabaseExport. This process allows you to make a backup of your Azure SQL Database and store it as an Azure blob. You can then restore these backups using Start-AzureSqlDatabaseImport. It’s all very handy to manage your data within the Azure environment.

Now let’s talk about what I alluded to at the end of that post: using this process to migrate data from your traditional SQL Servers to Azure SQL databases. As we have previously discussed, Azure SQL Database does not support traditional backups as we are used to with regular SQL Server. While there’s a debate on whether or not these should be supported, the reality is that we need another process to handle this. This is where the export/import process comes in.

BACPACing

SQL Server Data Tools(SSDT) have always had a process to extract your database. There are two types of extracts you can perform:

  • DACPAC – A binary file that contains the logical database schema and possibly the data. This file retains the platform version of the database (i.e. 2012, 2014, 2016).
  • BACPAC – A binary file that contains the logical database schema and the data as insert statements. This stores the platform version, but is not locked into it.

The DACPAC extract is useful for managing your database code. These objects can be source controlled and, using SSDT, can be used to compare to a current database state and deploy changes. I’m a big fan of using DACPACs to manage my database code and maintain code consistency. I don’t use the data extract portion, but it’s there if you need it (more on this in a later blog post).

BACPACs are a little more limited. They contain the schema and your data in a logical state, as insert VALUE statements to populate your database objects. The advantage is you get a flexible package that can deploy a database and its data to almost any SQL Server platform (with some caveats, which we will get to).  The disadvantages are that the BACPACs are not as efficient as native backups and are not transactionally consistent.

What this means is that BACPACs are not really suited for day to day backups of your database. They are intended to be a migration tool, especially if you are working with disparate versions of SQL Server. It is why they’re intended for moving databases to Azure SQL Database, because a BACPAC can move your database logically and you are not reliant on the underlying database architecture.

Which brings us to the caveat. While BACPACs allow us to move a database logically, it can not always take into account unsupported features. We can export a database from our SQL Server, but if we’re using something not supported in Azure SQL Database (such as CLR or Service Broker), then this migration will not work. If you are planning this sort of migration, you first need to review your databases for these issues.

Exporting Our Database

Enough about that, let’s get exporting. There are several ways to migrate your database, but we’re going to focus on Powershell and those cmdlets. We can use sqlpackage.exe to create the BACPAC, which is pretty easy (this is really one line, I’m separating it so it’s easier to read):

SqlPackage.exe 
/action:Export 
/SourceServerName:localhost 
/SourceDatabaseName:AdventureWorks2012 
/targetfile:'C:\temp\AW2012.bacpac'

Once we’ve got our .bacpac file, we need to get it up into Azure. For this we need a storage account, then it’s just a matter of copying the blob. For this, we will use the same storage container we used for the exports before. We will create a storage context for the storage account, then use Set-AzureStorageBlobContent to upload the .bacpac file.

$stctxt = (Get-AzureRmStorageAccount -ResourceGroupName test -Name msftest).Context
Set-AzureStorageBlobContent -File C:\TEMP\ADW2012.bacpac -Context $context -Container sqlexports

Liftoff to the Cloud

With our export loaded into Azure, we’re ready to import it into Azure SQL database. We need to first create a database to import the data into:

New-AzureRmSqlDatabase -ResourceGroupName 'IntroAzureSQL' -ServerName 'msf-sqldb' -Edition Basic -DatabaseName AWTEST

After this, it is just a matter of starting the import as we did previously. We need to create a connection context for our Azure SQL Database server, then start the import:

$cred = Get-Credential
$sqlctxt = New-AzureSqlDatabaseServerContext -ServerName msf-sqldb -Credential $cred
$request = Start-AzureSqlDatabaseImport -SqlConnectionContext $sqlctxt -StorageContext $context -StorageContainerName sqlexports -DatabaseName awtest -BlobName ADW2012.bacpac

Notice I save the output of  Start-AzureSqlDatabaseImport into a variable. This is an object requesting the import request, which I can use to check on the import. Remember that calling the cmdlet starts an asynchronous process that will import the schema and data of the .bacpac into your newly created database. We’ll want to check on the process to identify when it completes.

Double Check Your Work

The one last thing to do is to verify the migration, which requires two checks: the schema and the data. For the schema, we will go back to sqlpackage.exe to perform a schema comparison. This is a two step process:

  1. Extract the source schema as a .dacpac
  2. Generate a deploy report targeting the Azure SQL database. If no changes are shown, the schemas match.

Extracting the schema as a .dacpac is a similar operation to extracting the schema as a .bacpac:

SqlPackage.exe /action:Extract `
/SourceServerName:localhost `
/SourceDatabaseName:AdventureWorks2012 `
/p:ExtractAllTableData=True `
/targetFile:C:\Temp\AW2012.dacpac

Generating a deploy report is a similar command, though we have a couple gotchas. First, we’re connecting to our Azure SQL database, so we need our login and password passed to the command. Second, .dacpacs store the database platfom version and will halt if there’s a possible incompatibility. So we need to declare AllowIncompatiblePlatform=True in our sqlpackage call to ignore this. We’ll still get a flag that there could be incompatibilities, but it will at least run the comparison for us:

SqlPackage.exe /action:DeployReport `
/SourceFile:C:\Temp\AW2012.dacpac `
/targetServerName:msf-sqldb.database.windows.net `
/targetDatabaseName:AWTEST `
/targetUser:"$($cred.UserName)" `
/targetPassword:"$($cred.GetNetworkCredential().Password)" `
/p:AllowIncompatiblePlatform=True `
/OutputPath:C:\temp\AWMigration.xml

The resulting .xml file will tell us what changes the deployment would have to make to get everything lined up. Since the goal here is to verify that everything got deployed correctly, we want this report to not have any changes. The desired output would look a little like this:

2016-09-15_8-48-46

Since no changes are listed, there’s nothing to do and everything matches.

Checking your data can be a trickier proposition. For a basic “sniff test”, I just check the row counts of each table. For this, I have a query to check sys.partitions for heaps and clustered indexes (index_id is 0 or 1) and compares the source to the Azure SQL database to look for any differences:

$sql = "select
schema_name(schema_id) +'.'+ t.name as TableName
,p.Rows as Rows
from
sys.tables t
join (select * from sys.partitions where index_id in (0,1)) p on t.object_id = p.object_id
order by TableName"

$local = Invoke-Sqlcmd -ServerInstance localhost -Database AdventureWorks2012 -Query $sql
$azure = Invoke-Sqlcmd -ServerInstance msf-sqldb.database.windows.net -Database AWTEST -Query $sql -Username $cred.UserName -Password $cred.GetNetworkCredential().Password

$matches = @()
foreach($i in $local){
$matches += New-Object psobject -Property @{'TableName'=$i.TableName;'LocalRows'=$i.Rows;'AzureRows'=($azure | Where-Object {$_.TableName -eq $i.TableName}).Rows}
}
$matches | Where-Object {$_.LocalRows -ne $_.AzureRows}

Again, if everything worked correctly we shouldn’t get any output.

I should stress that these two checks do NOT replace thorough regression testing. These should give you a starting point to verify that your migration was successful, but you still will want to test your applications and processing.

The New Hotness

Now, while I would like for Microsoft to include some native cmdlets that accomplish these actions, it should be noted that sqlpackage.exe is a pretty solid tool. It can be used from the command line and wrapping PowerShell around it is still effective. The key is having something I can use from the command line so I can write repeatable scripts. This is important because Azure is driven by automation and, while we can use GUI tools and the portal, we won’t succeed long term in the cloud on these tools alone, so it’s important to understand all the options.